- (Exam Topic 4)
You have an Azure subscription that contains the resources shown in the following table.
User1 is a member of Group1. Group1 and User2 are assigned the Key Vault Contributor role for Vault1.
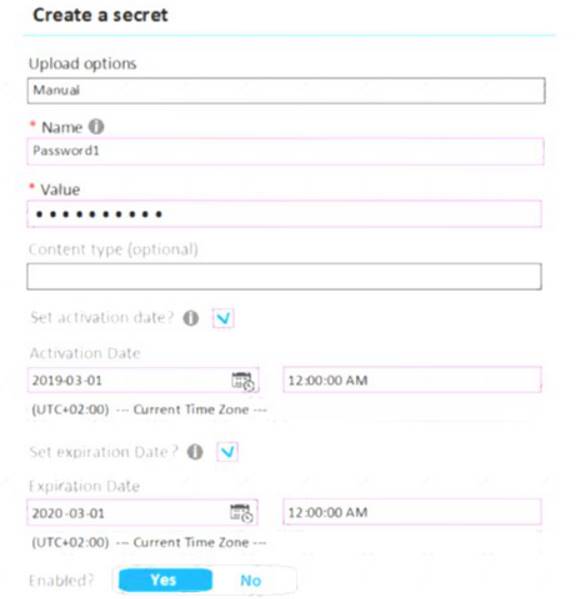
On January 1, 2019, you create a secret in Vault1. The secret is configured as shown in the exhibit. (Click the Exhibit tab.)
User2 is assigned an access policy to Vault1. The policy has the following configurations:  Key Management Operations: Get, List, and Restore
 Cryptographic Operations: Decrypt and Unwrap Key
  Secret Management Operations: Get, List, and Restore
Group1 is assigned an access to Vault1. The policy has the following configurations:  Key Management Operations: Get and Recover
 Secret Management Operations: List, Backup, and Recover
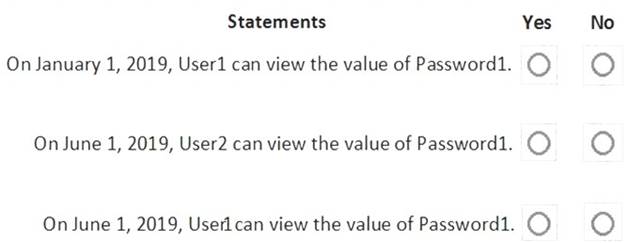
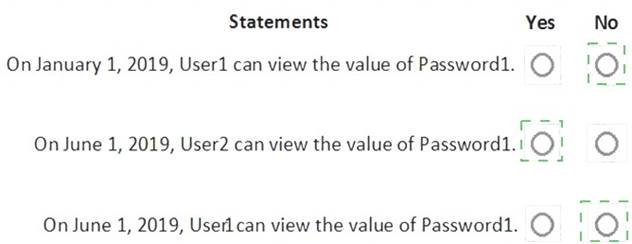
For each of the following statements, select Yes if the statement is true. Otherwise, select No.
Solution:
Does this meet the goal?
Correct Answer:
A
- (Exam Topic 4)
You have three on-premises servers named Server1, Server2, and Server3 that run Windows Server1 and Server2 and located on the Internal network. Server3 is located on the premises network. All servers have access to Azure.
From Azure Sentinel, you install a Windows firewall data connector.
You need to collect Microsoft Defender Firewall data from the servers for Azure Sentinel. What should you do?
Correct Answer:
C
Reference:
https://docs.microsoft.com/en-us/azure/sentinel/connect-windows-firewall
- (Exam Topic 4)
You have an Azure subscription that contains a
You need to grant user1 access to blob1. The solution must ensure that the access expires after six days. What should you use?
Correct Answer:
C
Depending on how you want to authorize access to blob data in the Azure portal, you'll need specific permissions. In most cases, these permissions are provided via Azure role-based access control (Azure RBAC). For more information about Azure RBAC, see What is Azure role-based access control (Azure RBAC)?.
https://learn.microsoft.com/en-us/azure/storage/blobs/authorize-data-operations-portal
- (Exam Topic 4)
You have an Azure subscription that contains a storage account named storage1 and a virtual machine named VM1.
VM1 is connected to a virtual network named VNet1 that contains one subnet and uses Azure DNS.
You need to ensure that VM1 connects to storage1 by using a private IP address. The solution must minimize administrative effort.
What should you do?
Correct Answer:
D
- (Exam Topic 4)
You have Azure Resource Manager templates that you use to deploy Azure virtual machines.
You need to disable unused Windows features automatically as instances of the virtual machines are provisioned.
What should you use?
Correct Answer:
B
You can use Azure Automation State Configuration to manage Azure VMs (both Classic and Resource Manager), on-premises VMs, Linux machines, AWS VMs, and on-premises physical machines.
Note: Azure Automation State Configuration provides a DSC pull server similar to the Windows Feature DSCService so that target nodes automatically receive configurations, conform to the desired state, and report back on their compliance. The built-in pull server in Azure Automation eliminates the need to set up and maintain your own pull server. Azure Automation can target virtual or physical Windows or Linux machines, in the cloud or on-premises.
References:
https://docs.microsoft.com/en-us/azure/automation/automation-dsc-getting-started